Deploying to a single Docker Host
If you plan to run your API Management instance on a single docker host, or by leveraging a Docker Swarm using docker-compose, this guide is for you.
This document assumes that you already have a configuration repository (with a static directory in the root of the repository), see creating a portal configuration, and that you are familiar with using the Kickstarter.
It is also assumed that you have Docker host certificates and keys for use with docker-machine so that you can talk to your docker host using the usual docker and docker-compose commands. This is not part of the guide.
Initial Deployment
Enable env vars for portal and API hosts
Enable using environment variables for the host names you want to deploy to. To do that, open up the IP, DB and DNS page in the kickstarter. Click the two checkboxes depicting that:
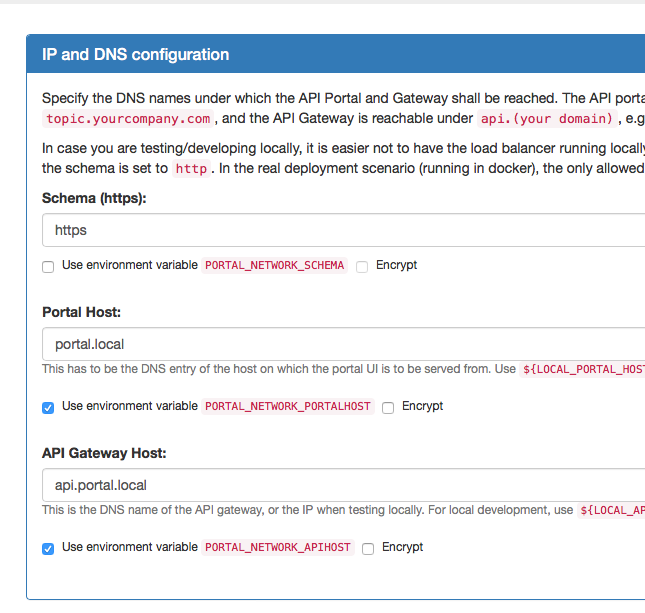
Hit "Save" to save the configuration. Now you will be able to see that there are two new environment variables.
Create a deployment environment
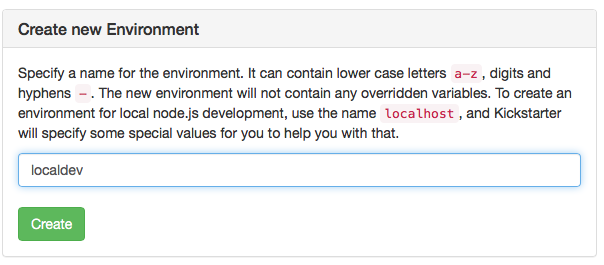
To keep the settings for local development and the deployment to the docker host apart, you must create an environment. Throughout this document, this environment is called prod, but you are free to use whatever name you like, as long as it's not localhost. You may also create multiple environments, e.g. in case you have a test or stage environment in addition to a prod environment. Here, we will assume prod.
Within the kickstarter, go to the Environments Page and create a new Environment called prod:
Open up that environment and override the PORTAL_NETWORK_APIHOST and PORTAL_NETWORK_PORTALHOST environment variables:
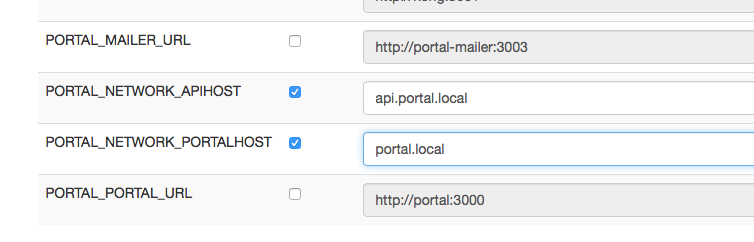
Use correct values for the variables; these DNS names must be CNAMEs (or A-records, depending on your DNS setup) pointing to your docker host IP. In principle, these two variables can have any address you can control, as long as they point to the docker host, so that the HAproxy can route the VHOSTs correctly to the backends.
Note that these environment variables are kept inside the portal configuration; they do not need to be set from the "outside", they are extracted at runtime.
Create a docker-compose.yml file
Go to the Deployment Page in the Kickstarter; if you don't have a docker-compose.yml in your base configuration directory, it will look like this:
Hit the "Save" button, and two files will be created:
docker-compose.ymlstatic/Dockerfile
Inside the docker-compose.yml file, the static/Dockerfile is referenced; see also the deployment architecture for a picture of how the containers work together. The static/Dockerfile is used to build the "Static Configuration Container".
Depending on which method of injecting the static configuration into the portal-api container you choose, the static/Dockerfile might not be used; as of wicked 0.11.0 the recommended way of deploying is the git clone method.
Important: Even if you already created a docker-compose.yml with a previous (pre 0.11.0) version of the Kickstarter, you may want to recreate it again to benefit from the improved compose template.
Choosing static configuration deployment method
- The git clone method for injecting static configuration into the portal API
- The data-only container method for injecting static configuration into the portal API
Changes to docker-compose.yml when using the git clone method
You decided to use the git clone method? GOOD! Now you have to change your docker-compose.yml slightly, as it's by default set up to use the data-only container method (as this is the only one which will work when working completely locally, without having the static configuration repository in git!).
- Remove/comment out the
portal-api-data-staticservice: You will not need this, as the static repository is cloned each time at startup anyway; no need to have a specific container for that! - Remove the volume
portal-api-data-staticfrom theportal-apiservice: See above -- we don't need the volume, as it will be overridden by thegit cloneanyway
Inject SSL certificates
At deployment of the API Portal compose file, you will also need valid SSL certificates for use in the HAproxy; these should match the domain names you specified above (or for internal deployments those can also be self-signed certificates, but this requries your clients to accept them explicitly).
Pass in the following two environment variables:
| Variable | Description |
|---|---|
GATEWAY_PEM |
The certificate and key for the API end point (PORTAL_NETWORK_APIHOST) |
PORTAL_PEM |
The certificate and key for the API Portal end point (PORTAL_NETWORK_PORTALHOST) |
The values of these variables must be in a special format for HAproxy to be able to extract them; from certificate and private key files, assemble them like this:
export GATEWAY_PEM=$(cat {{envName}}/gateway-key.pem {{envName}}/gateway-cert.pem | tr -d '\015' | awk 1 ORS='\\n')
export PORTAL_PEM=$(cat {{envName}}/portal-key.pem {{envName}}/portal-cert.pem | tr -d '\015' | awk 1 ORS='\\n')
Deploy time environment variables (overview)
| Variable | Mandatory | Description |
|---|---|---|
NODE_ENV |
yes | The environment name to start the API Portal in; e.g. prod |
PORTAL_CONFIG_KEY |
yes | The deployment key which was created at the initial creation of your portal configuration |
PORTAL_NETWORK_APIHOST |
yes | The domain name of the API Gateway host; this is needed to configure HAproxy in the right way (HA proxy cannot access the internal dictionary of environment variables) with the VHOST of the API Gateway |
PORTAL_NETWORK_PORTALHOST |
yes | Idem for the portal VHOST |
DEBUG |
- | Debugging parameters for use in the wicked core components. See docker images for more information. |
GIT_REPO |
(yes) | The repository to get the static configuration from, e.g. bitbucket.org/yourorg/apim.config.git. Mandatory if you want to use the git clone method for injecting the static configuratin. |
GIT_CREDENTIALS |
- | The git credentials to use with the GIT_REPO, as username:password, possibly URI encoded in case the password contains difficult characters. If empty, a public repo is assumed. |
GIT_BRANCH |
- | The git branch to checkout. Mutually exclusive with GIT_REVISION. |
GIT_REVISION |
- | The exact SHA revision has to check out using git, has to be the "long" revision hash. Mutually exclusive with GIT_BRANCH. |
Use Cases
The CI/CD use cases now follow for the "Deploy to Docker Host" deployment method (see continuous deployment).
Initial deployment
You are now set to do an initial deployment to your docker host, assuming that you have configured your shell using docker-machine env to make docker and docker-compose talk to your desired docker host:
When using the git clone method
docker-compose up -d
When using the data-only container method
docker-compose build
docker-compose up -d
Updating the API Configuration
Works as of version 0.11.0
Updating the API configuration is just a matter of getting a new version of the static configuration into the portal API container.
When using the git clone method
Depending on whether you want to use a specific GIT_REVISION or not, set that environment variable. Otherwise HEAD of the selected branch (using GIT_BRANCH, or master if left out) is used:
docker-compose up -d --force-recreate portal-api
Please note that this will lead to a slight downtime for the portal API, and as a consequence of all dependant containers. These will detect that the configuration has changed and will restart themselves. This will usually not be noticeable, but there is a slight downtime (which currently can not be avoided).
When using the data-only container method
Assuming the Dockerfile is in the static directory and the default deployment docker-compose.yml file is used, proceed as follows:
docker-compose stop portal-api
docker-compose rm portal-api portal-api-data-static
docker-compose build portal-api-data-static
docker-compose up -d
This first destroys the portal-api and portal-api-data-static containers and subsequently rebuilds and deploys them again. This approach has a longer downtime than the above one (depending on hardware 30-60 seconds) due to the destruction of the portal-api container.
Updating the wicked Core components
All wicked components always need to be deployed in the same version, so it is highly advisable to deploy them all in one go (otherwise they will refuse to run together).
This part does not differ between the two methods of injecting the static configuration.
Always pay attention to the release notes when updating the wicked core Components.
Edit the docker-compose.yml to use the new version
Open up your docker-compose.yml file and change the image tags of the wicked components: portal-api, portal, portal-kong-adapter, portal-mailer, portal-chatbot and kong. Choose the tag you want to use. Always use the same tag for all components! The only exception to this is when explicitly stated that it's not needed in the release notes (this may be the case for the kong service).
Deploy the new version
docker-compose pull
docker-compose up -d --force-recreate
This will create a short downtime (around a minute), so you may want to do this at a time where not many users are using your API Management Portal or Gateway(!).
Updating Kong API Gateway
In this scenario, the Kong Gateway is treated same as the wicked Core Components, so see above.
Updating the Postgres Database
Currently, there are no plans on moving away from the postgres:9.4 image. This image may be updated once in a while, so doing a docker-compose pull from time to time may be advisable, but otherwise there is currently no need to upgrade the Postgres image; it's stable and very mature.
If in the future Kong will need a later version of Postgres, this will be described in the release notes when it's time.
Docker Q & A
Tips and tricks on transferring docker certificates
A surprisingly tedious task to solve when working with docker hosts is how to make your build server or CI/CD tooling be able to work with a specific docker host. This will most probably be something more and more tools will be able to support in a better way in the future, but in the meantime this has to be solved manually for most systems (such as Jenkins or GoCD).
We have mostly solved it in the following way:
- When creating a docker host using
docker-machine, a folder~/.docker/machineis created containing the server certificates and all such - Copy this folder to a temporary work folder
- Optional: Remove all machines folders from
.docker/machine/machinesyou do not need on the build server - Optional: In case you have a
.docker/machine/cachefolder (containing aboot2docker.iso), you can safely remove this as well, it's wasted space - Open up the
.docker/machine/machines/<yourmachine>/config.jsonfile in a text editor - Make all file paths start with
.docker/machineinstead of having the full path in the file names tar cvfz docker-machine.tgz .docker
Now you have a docker-machine.tgz archive you can use on your build server:
- In your configuration repository/the directory containing the
docker-compose.yml tar xvfz docker-machine.tgzeval $(docker-machine -s .docker/machine env <yourmachine>)- Docker now talks to your docker machine, as long as you remain in the current working directory; otherwise docker will not be able to resolve the needed certificates (as they are relative)
Encrypting and decrypting the certificates
To take automation a step further, you may also check in the docker-machine.tgz to source control, together with the shell script to extract it, and deploy your configuration. Prior to doing this, we usually encrypt the docker-machine.tgz using openssl, with the PORTAL_CONFIG_KEY as a key.
Encrypting and decrypting the tar archive can be done like this (or using any other encryption method):
# encrypting
openssl enc -e -aes-256-cbc -k ${PORTAL_CONFIG_KEY} -in docker-machine.tgz -out docker-machine.tgz.enc
# decrypting
openssl enc -d -aes-256-cbc -k ${PORTAL_CONFIG_KEY} -in docker-machine.tgz.enc -out docker-machine.tgz
Storing an unencrypted certificate archive in source control is probably a bad idea. If you have other means of storing secrets, such as Hashicorp Vault or similar, that is most surely an even better possibility.